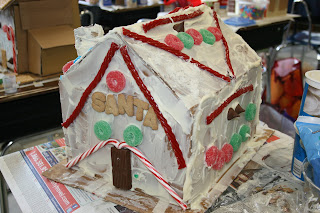
It still 'Tis the Season of gingerbread, sweets and sticky fingers, so I thought I would share with you a cute craft project my kids did the last week of school. In our elementary school, both the Kindergarten and 4th grade undertake special gingerbread projects the week before Christmas. With a kid in both Kindergarten and 4th this year, we were up to our ears in gingerbread houses. But, with no baking involved, it was lots of fun. So here are two fun options for creating a "no bake" gingerbread house.
The Kindergarten kids covered a small pint container(oj or half and half size) with frosting and then pushed graham crackers onto the sides to create the "gingerbread". Then it was anything goes as they decorated with the candy of their choice. The parents were invited in to help out and it was a nice chance to spend some time in the classroom.
The 4th grade project was more of an undertaking and was part of their math unit on perimeter and measurement. Each kid was to plan out on graph paper the dimensions of their house and then build a cardboard model based on those measurements. They had to draw diagrams of how they planned to decorate each side, create a key for the candy plan and then a shopping list (for mom) of candy needed. They covered the entire house with frosting (2 cans in our case!) and then followed their decorating diagram to stick on the candy. The last day of school, parents were invited to "walk down gingerbread lane" and view all the houses lined up on tables in the hallway.
Tuesday, December 27, 2011
Monday, December 12, 2011
Crafting with the Kids-Keepsake Ornaments
I have seen some beautiful ideas on the creative and vintage blogs I follow for filling the clear glass ornaments that are available at craft stores this time of year. My favorites all feature narrow strips of paper, rolled and fed into the ornament so scattered bits and pieces of the images show. I have seen beautiful ornaments filled with vintage paper, old song sheets and even a wedding invitation. I wanted my version to be a keepsake ornament that I could make with my kids. I wanted their doodles to be the images that would be featured in the ornament. I cut long thin strips of scrapbook paper and let the kids write their names and doodle and draw on the back (white side). I then had the kids curl the strips around a pencil (to help the paper along with it's job of circling inside the ornament). Then the kids fed each strip of paper into the glass balls.
For additional color and texture, you can glue ribbon to the backside of one of the scrapbook strips and the firmness of the paper will help the ribbon to hold a curled shape inside the globe. The kids also punched out stars and christmas tree shapes that were small enough to fit inside. The ornament can hold quite a few strips, so this will be an "ongoing" project this week to keep the kids busy. Each is making their own keepsake ornament for our tree and then will decorate additional strips to be combined into one ornament for the grandparents.


For additional color and texture, you can glue ribbon to the backside of one of the scrapbook strips and the firmness of the paper will help the ribbon to hold a curled shape inside the globe. The kids also punched out stars and christmas tree shapes that were small enough to fit inside. The ornament can hold quite a few strips, so this will be an "ongoing" project this week to keep the kids busy. Each is making their own keepsake ornament for our tree and then will decorate additional strips to be combined into one ornament for the grandparents.


Sunday, December 11, 2011
Cookie Exchange Home Run-Oreo Truffles
Gracefully handling a Holiday cookie exchange has been one of my December goals for the past few years. I love being invited, but completely freak out that I am willingly adding more to my "to do" list just a few weeks before Christmas. I am usually knee deep in mailing out gifts to relatives, decorating the house and trying to make things special for my kids. The thought of baking 5-7 dozen cookies on top of my usual stuff is a little daunting. But, I love the chance for a night out with my friends and it always puts me in the Holiday spirit.
I have kept my eyes open for the ideal cookie that would be pretty, easy to make and yummy. I figured that if I could find the veritable home run of cookies for a cookie exchange, I could relax and enjoy myself the next time an invitation or evite arrived. I had set my sights on peppermint bark (which I convinced myself qualifies as a cookie). It is festive, easy to make, and friends would happily take it home to serve to guests. But recently, my friend Linda, told me about Oreo Balls (also known as Oreo Truffles). They sounded too good to be true. They fit all my cookie exchange criteria.
I found a recipe for Easy Oreo Truffles at The TomKat Studio and Kim even includes a free printable recipe card and label. Three simple ingredients, no baking involved and they look decadent. I couldn't ask for a better cookie exchange home run.
Friday, December 9, 2011
A Sea of Snowmen
I have a sea of snowmen on my kitchen counter and they are really putting me in the Christmas spirit. An activity we had planned this week for our boy scout meeting fell through, so I had to scramble to come up with something to keep the boys occupied. When all else fails, plan a craft project! I searched for a mason jar snow globe tutorial and found one from julie ann art's blog that we will be doing with the boys (here is the snow globe tutorial link). You need specific supplies like distilled water, a little glycerin and very strong water proof glue, but I think the end result will be worth it. There were a number of tutorials out there without liquid, but I knew the boys would want the real deal. I had hoped the boys would be able to glue down their own trees and snowmen, but all the glues I looked at suggested a good 24 hour dry time before getting wet. Plus, a group of ten year old boys and a bottle of crazy glue is a recipe for disaster! I opted for a glue called "liquid fusion, clear urethane" that I found at Michael's that promises to be 100% waterproof. I think 2 jugs of water and a huge shaker of glitter snow will give them enough things to spill and splatter all over the kitchen!
We will also be writing Holiday letters to servicemen for a "Season of Service" project. Here is the link if your kids want to participate.

We will also be writing Holiday letters to servicemen for a "Season of Service" project. Here is the link if your kids want to participate.

Friday, December 2, 2011
Sew Cute
For years I have been searching for a vintage sewing basket. I know what I have been hoping to find. Wicker basket, firm fabric covered top, similar to the signature Cath Kidston sewing baskets. Only I want old, vintage, well loved. I have seen my dream basket, but it is usually in a background shot of someone's sewing room or studio on a blog or in a magazine. Never front and center, never for sale, just perfectly perfect and out of reach.
This week I came across the cutest sewing basket I have seen in person to date and snatched it up for $12. Wicker basket, firm wood lid, bright floral decal. I love it.
It is adorable inside and out. The label inside says "Princess, Algonquin Illinois". I was hoping to research the history of my new find, but my google search didn't reveal any info. about the company, just many more listings on etsy and ebay for more of these cute baskets. Soft pastel colors, nice floral lids and even a few with poodles on the sides! My search also revealed that mine is missing the original cording which went through the holes you see in the bottom and lid to form handles. Hence the $12 price I guess!
I'm happy to have finally found what I was looking for. And, I will keep my eyes open for another with the original cording intact to hold the lid on (isn't this how collections get started?). Until then, if anyone knows anything about the history of these cute baskets, please let me know.

Subscribe to:
Comments (Atom)


