Showing posts with label Creative Quick Fix. Show all posts

Sunday, March 17, 2013

Glittery Goodness


I found this etched glass hurricane at a consignment shop last year and keep it in the center of my dining room table.  It makes for a simple holiday display.  I just fill it with acorns, vintage ornaments, candy etc. and I am well underway with my holiday decorating.  For Easter, I have filled it with vintage inspired glitter eggs.
I raided my stash of plastic eggs and found some clear glitter flakes
 I had used for making snow globes with the kids.
One coat of spray adhesive and a quick roll in the glitter flakes gave me exactly the look I was hoping for.  The benefit of spray adhesive is that if you miss a spot, 
you can spray that spot again and dip it back in the glitter.


Sunday, February 3, 2013

Creative Quick Fix

Everything I ever plan to do gets put on my "to do" list.
The bad news, I have a long list.
The good news, "make necklaces" is right up 
there next to "call insurance on surgery bill".  
Sometimes crossing something off my list
 involves a little guilt free fun.
I've been collecting vintage clip earrings with the hopes of making necklaces.
 I finally found the perfect chains.
A quiet hour in my day and a little creative energy
 was all the motivation I needed.
Cross that item off my to do list!


Friday, December 14, 2012

Some Christmas Crafting Eye Candy

Each year, I make a few wreaths to be sold at a local fundraiser.  
My friends Karen and Liz started a performing arts program for kids
 with special needs and the "Festival of Wreaths" is their main fundraiser.  
It's a wonderful organization and a fun event.  
Plus, how can I resist an excuse to run to the craft store, heat up
 my glue gun and put off addressing Christmas cards for one more day? 
 I love how this lollipop and gumdrops wreath turned out.  
A lady bought it for her kitchen.  
The anal retentive crafter at work...
I'm not good at casually throwing something together and making it look fabulous.  
A woman did fall in love with this one and is mailing it to relatives in Alaska.
My favorite.  
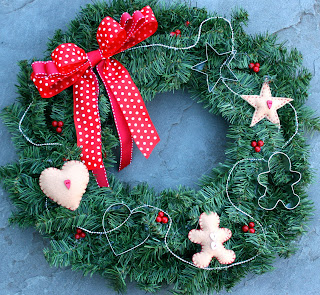
Some cookie cutters, felt blanket stitched cookie ornaments and polka dots. 
 I make this one every year and it is a crowd pleaser.

Linking with:


Wednesday, August 29, 2012

Simple Summer Fun

While on vacation, we've been enjoying playing board games at night.  Some friends came to visit and introduced us to Bananagrams.  It has quickly become a new family favorite. It is very similar to Scrabble, but without a game board and it moves along quickly.  It's a great after dinner game and my 6 year old has even been using the letter tiles to work on her spelling during the day.  But, I couldn't resist sharing these pictures of our second favorite game this summer-good old fashioned checkers.
We discovered this homemade checkerboard painted on
 the outdoor picnic table and it has kept us busy.
  
So simple and charming.

Linking With:


Tuesday, July 31, 2012

Creative Quick Fix~Apron Skirt

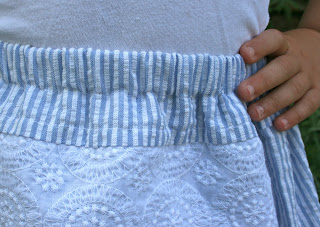
Needing to prove to myself that I could fit in a little creative time this summer, I tackled a project that I have been wanting to try for a while.  For years I have admired the variety of apron skirts on the web and have visions of using some of my vintage linens to make one for my daughter.  To play it safe, my first attempt was with modern day fabrics I found at Jo-Ann's.  Seersucker is such a fun summer fabric and I fell in love with this funky medallion eyelet stitched cotton.  
A google search turned up a variety of tutorials to pick from.  I settled on this one from lilblueboo because Ashley provided a helpful size chart and I liked the waistband detail.  It only took a few hours and with the elastic waistband, I'm sure my reluctant model will be able to wear it next summer as well!

Friday, July 20, 2012

A Little Crafting Time-Short but Sweet

With Summer in full swing, it's hard to know when I will get a few minutes at the sewing machine.  Each week we seem to have a different schedule of camps and activities and I'm busy making sandwiches, grabbing drinks for the kids and hanging their towels to dry!  It is a welcome change from the school year, but fast and furious.  I managed to squeeze in a little crafting time this week and make a few of my vintage inspired wine bottle wraps.  I took a few liberties on my choice of "vintage" fabric.  I couldn't resist this bright floral fabric for Summer.  Then again, it might be fun to hunt down some vintage 
Laura Ashley or Lilly Pulitzer fabric and make a few more......

Thursday, June 14, 2012

Pint Sized Kitchen Makeover

When I posted about my haul of treasures from my day at the Brimfield Antiques Show in May, I showed off this adorable tin child's sink that came home with me.
It wasn't perfect.  But, I had passed on a number of expensive tin kitchen sets
 throughout the day and knew that this one had potential.  I wasn't looking for 
perfect, just a cute piece to display on my shelf.
I think everyone was rooting for this little sink.  I had many requests to post pictures once the skirt makeover was done.  It was quick and easy.  I sewed a rod pocket along the top of a piece of vintage gingham fabric and used a crochet hook for the rod.  Super easy, super cute!  So what do you think?   


Sunday, April 8, 2012

Happy Easter~Vintage Inspired Wreath


Happy Easter!
Everyone has been sharing amazing Easter projects and inspiration for weeks, but I couldn't resist showing off this one last vintage inspired project.  My friend Linda texted me this photo of her neighbor's beautiful wreath and I immediately needed to know the details.  Her neighbor, Susan, has been collecting bits and pieces of Easter decor for many years (I think she said 20!) and tossing them into a big zip lock bag.  Susan finally decided to make them all into something and this is what she came up with.  An amazing collection of memorabilia (the card in the center was given to her as a child) put together so beautifully.  This is a wonderful idea to keep on your wish list for next year and now is the perfect time to scoop up Easter trinkets at the craft and consignment shops and start assembling your stash.  

Thursday, March 22, 2012

Assembly Line Crafting

Last week I had one of those weeks where all the stuff I needed to get done (the dreaded "to do" list) beat out all the things I would rather have been doing.  I committed to tackling most of my "to do" list, but knew that if I kept a little time for being creative, I would be more productive in general.  I needed a simple project that wouldn't require too much of my attention.  I took my own advice and printed out the pattern from my mini bottle apron tutorial and got to work.

This project was the perfect creativity quick fix that I could stop and start as needed while tackling my "to do" list each day.  And I found the repetitive "assembly line" nature of making multiple mini aprons to be very relaxing.  So, that's what I did.........
 If only I had had a few friends around to help me......

Friday, March 9, 2012

A Crochet Quick Fix


In third grade, my neighbor's grandmother taught me to crochet and a crafter was born.  I made everything and anything that could be created with the basic chain stitch and that my pets at the time (a dog and two cats) could wear.  I created blankets, scarves and even hats for my pets and they enjoyed wearing them.  By fifth grade I had moved onto needlepoint and never had a chance to learn any of the more advanced crochet stitches or techniques.


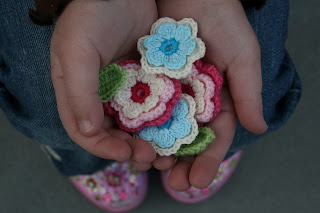
Years ago, when crochet flowers started showing up on hats, scarves and clothing I was determined to learn how to make crochet flowers.  I checked out books from the library, but couldn't find the time to re-introduce myself to crochet and figure out how to make these cuties.  One night when I was randomly cruising Etsy, I typed in "crochet flowers" and found a wonderful quick fix to tide me over until I can find the time for crochet.  My daughter enjoyed laying the flowers and petals out on a long sleeve T.  I sewed them down and then added some of my beloved blanket stitch to the collar.


With Spring right around the corner, we will have to find some more shirts!


ThriftyThursdayModernButton1 Thrifty Thursday Week 68

Monday, January 23, 2012

I (Heart) Blanket Stitch

I had hoped for a productive Sunday.  We had finally gotten our first real snowfall and it was the perfect day to play with the kids and sneak in a little crafting.  I got out my sewing machine, my fabric stash and my crafting "to do" list and then.......... nothing.  I started, I stopped, I changed my mind and moved onto another project, I got distracted, I played with the kids........  Nothing really came together all day.
And then after the kids went to bed and my husband was happily watching the Giants game, I went upstairs to my cozy little corner chair and decided to add some blanket stitch to an appliqué.  And I felt productive and relaxed and peaceful.  
  And as the Giants went into overtime, I stitched and stitched and stitched and even patched my daughter's jeans because I wasn't ready to call it a night. 

Check out my giveaway!

 shabby creek cottage

Tuesday, December 27, 2011

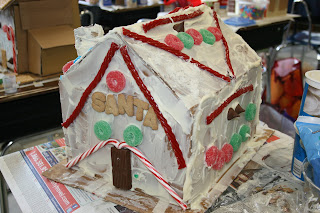
Crafting with the kids-No Bake Gingerbread Houses

It still 'Tis the Season of gingerbread, sweets and sticky fingers, so I thought I would share with you a cute craft project my kids did the last week of school. In our elementary school, both the Kindergarten and 4th grade undertake special gingerbread projects the week before Christmas.  With a kid in both Kindergarten and 4th this year, we were up to our ears in gingerbread houses.  But, with no baking involved, it was lots of fun.  So here are two fun options for creating a "no bake" gingerbread house.
The Kindergarten kids covered a small pint container(oj or half and half size) with frosting and then pushed graham crackers onto the sides to create the "gingerbread".  Then it was anything goes as they decorated with the candy of their choice.  The parents were invited in to help out and it was a nice chance to spend some time in the classroom.
The 4th grade project was more of an undertaking and was part of their math unit on perimeter and measurement.  Each kid was to plan out on graph paper the dimensions of their house and then build a cardboard model based on those measurements.  They had to draw diagrams of how they planned to decorate each side, create a key for the candy plan and then a shopping list (for mom) of candy needed.  They covered the entire house with frosting (2 cans in our case!) and then followed their decorating diagram to stick on the candy.  The last day of school, parents were invited to "walk down gingerbread lane" and view all the houses lined up on tables in the hallway.

Monday, December 12, 2011

Crafting with the Kids-Keepsake Ornaments

I have seen some beautiful ideas on the creative and vintage blogs I follow for filling the clear glass ornaments that are available at craft stores this time of year.  My favorites all feature narrow strips of paper, rolled and fed into the ornament so scattered bits and pieces of the images show.  I have seen beautiful ornaments filled with vintage paper, old song sheets and even a wedding invitation.  I wanted my version to be a keepsake ornament that I could make with my kids.  I wanted their doodles to be the images that would be featured in the ornament.  I cut long thin strips of scrapbook paper and let the kids write their names and doodle and draw on the back (white side).  I then had the kids curl the strips around a pencil (to help the paper along with it's job of circling inside the ornament).  Then the kids fed each strip of paper into the glass balls.


 For additional color and texture, you can glue ribbon to the backside of one of the scrapbook strips and the firmness of the paper will help the ribbon to hold a curled shape inside the globe.  The kids also punched out stars and christmas tree shapes that were small enough to fit inside.  The ornament can hold quite a few strips, so this will be an "ongoing" project this week to keep the kids busy.  Each is making their own keepsake ornament for our tree and then will decorate additional strips to be combined into one ornament for the grandparents.


Wednesday, October 26, 2011

Vintage Bib Makeover


When I'm searching for vintage linens, I seem to be drawn to unique and whimsical children's pieces. It's hard to resist a cute bib or crib quilt, even though my youngest is 5 and "too big", as she says, for any of those things. Still, I couldn't resist this pair of cat bibs.
After enjoying them for many months just hanging in my closet, I knew it was time to find a place for them around the house. I couldn't bear to cut into them, but realized they already had a backing and could be made into pillows (hopefully for my bed since the kids were "too big" for such cuteness). All I needed to do was snip off the neck ties and cut a small opening for stuffing. My big girl enjoyed the stuffing part.
And we were done....... A simple no sew project and 2 adorable pillows. Turns out my daughter isn't "too big" for adorable cat pillows and she has swiped them for her bed!
Luckily, I used the pillows as inspiration for a new item in my etsy shop and now I have my own "vintage inspired" kittie pillows to keep me company.
I'm linking withSomewhat Simple shabby creek cottage